The Bidding Decisions can help you to make better choices. E.g., you want to know if you should be in 3NT or in 4♠. Or make a game-try after 1♠-2♠ or just bid game. Or partner invites for game/slam and you have to decide. The main tab offers five possibilities which all give certain insights:
- Made exactly
- Made at least
- Compare bids
- Invite
- Accept
You have this hand:
♠ K J 8 4 3
♥ K T 7
♦ A Q
♣ K J 5
Partner raised 1♠ to 2♠ and now it is your turn. If you play constructive raises you can bid game. It is usually better to play in NT in Imps when having a 5332 opposite a 4333 so you might bid 3NT and leave partner the choice. If partner's raise is 6-10 HCP you must be a bit careful. Your hand is ok, but far from great. Let us dive deeper into this. We give North three patterns. First 6-10 with 3-card support and no shortness. Second is 6-9 with a 4-3-3-3. With other 4-card supports North has a Mixed Raise, a Bergen or a weak 3♠-bid. And the last one is a 5 count with a singleton or void and 3♠. This can be achieved by defining the length ♠ is 3-3, included shapes are 13 and 03 etc. Looking at the preview screen, I decided to add an extra condition: an exclude pattern if North has a 10 count with 4 controls. This looks like too much for an invitational hand.
The Made exactly and Made at least is the same information but the latter is the total.
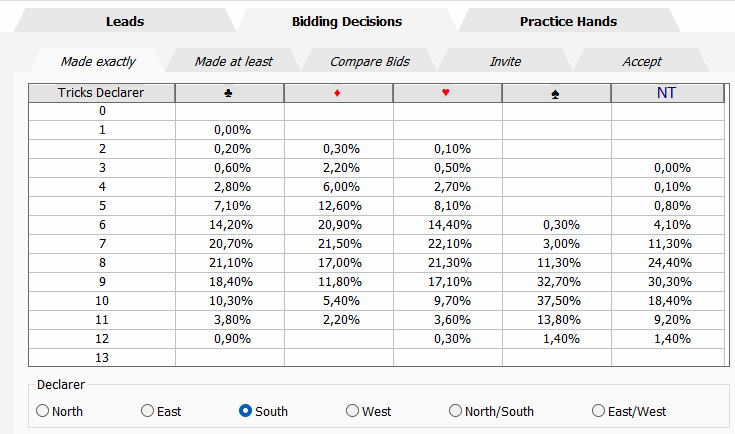
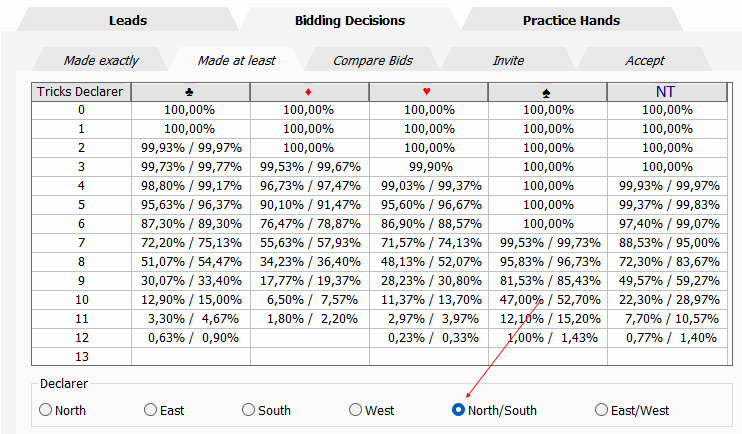
Below the grid you can choose who the declarer is. It will be no surprise for you that South should play this hand will all the protected holdings. Another interesting point is that South will make 52.7% at least 10 tricks in ♠ but 59.27% in NT. Let's have a look at the compare screen.
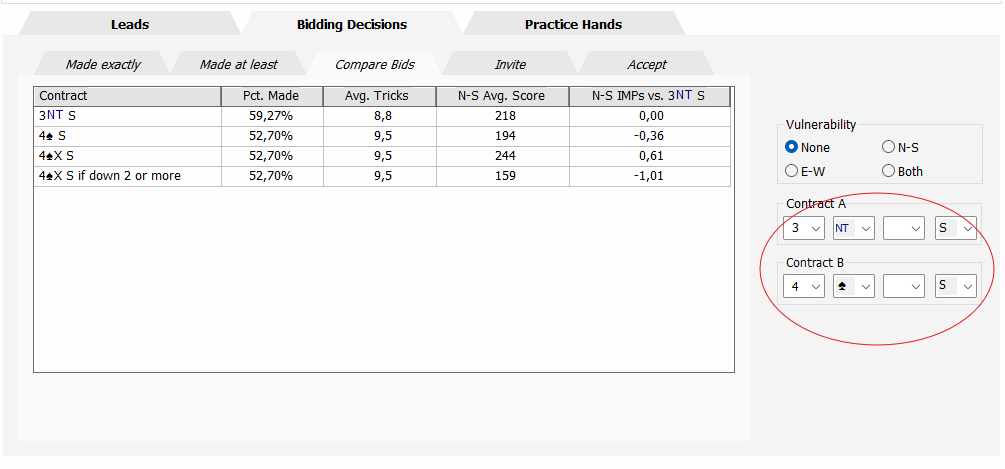
In the right corner you can set the contract. The B-one must always be higher than contract A else you get an annoying error message. This grid also shows the average tricks and the scores. These are calculated against the vulnerability you choose on the right. The grid also shows what happens if they double you in 4♠. In certain competitive auctions you can expect this to happen. More often if you go down 2 or more.
In a team match 50% is enough for a non-vulnerable game. Since both 3NT and 4♠ are above, inviting isn't best. Better bid 3NT and hope partner does the right thing. Let's change the hand a bit so we do have an invitational one:
♠ K Q 8 4 3
♥ K T 7
♦ A Q T 6
♣ 5
Now you are vulnerable to, so it is even more attractive to bid game. You have a decent 14 count and if it fits well, you have a very good game. The Invite tab looks like this:
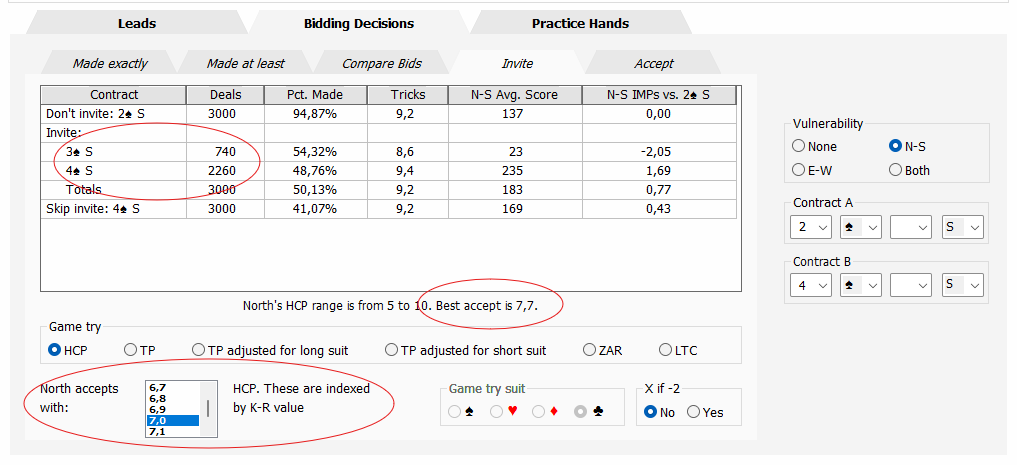
An invite screen needs an invite. Since the A-Contract is set to 2♠ the invite is 3♠. This doesn't mean you have to bid 3♠ but if the invite is rejected, it will lead to that contract.
In the circle in the grid you can see that the invite is rejected 740 times out of 3000. In the lowest circle it is given that the invite is accepted with 7 HCP or more. This is the truncated middle of the North possible pattern range which was 5-10 HCP. Right below the grid you find that the optimum value for acceptance is 7.7. This means you should accept with the 30% best 7 HCP hands or better. The application uses the K-R value of a hand to determine how strong the 7 HCP is.
The last row in the grid shows what happens if South doesn't invite at all. Jumping to game gives the least information and has an advantage at the table.
So the conclusion of this hand is that it is certainly worth an invitation. If you make a minor change to the definitions you can get (big) different results. E.g., switch the ♦T to the ♦J or ♦2. Another thing is that if you switch the ♠KQ to the ♠KJ. A double dummy analyzer will drop the Qx behind or executes some other fancy trump play. We mortals usually don't do that.
If you select Total Points with Long Suit or Short Suit as Game Try type, the suits below it will be enabled. These too have influence on the TP calculation of the North hand. For each pattern you can set its definition to Dummy or Declarer points. Since South is the hand with long ♠, you would set the North patterns to Dummy points.
One note about the Game Try. A short suit try is technically best, but many top players don't use specific tries at all because it gives away too much information. In a sequence as 1♠-2♠-2NT is a typical catch all Game Try on which North can bid values.
The last tab is the Accept. It gives insight for the North hand what to do. So you don't have to change all the values in the 'North accepts with' box.
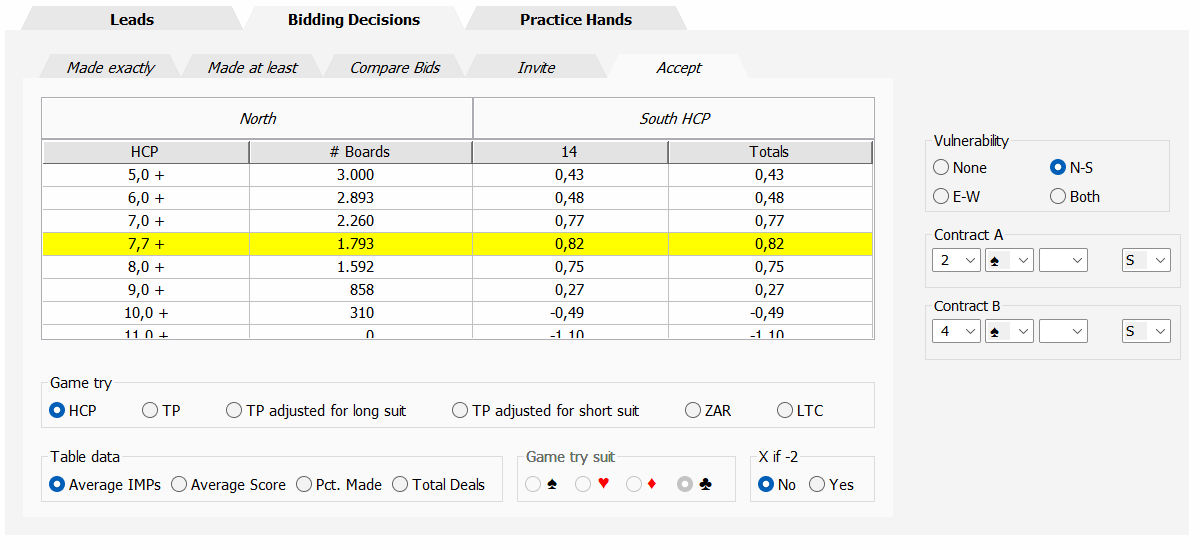
This is how you read the grid. It gives the result of what happens if North starts accepting the invite from a certain point range. So if North accepts from any 7 HCP (which are 2260 boards) the profit would be 0.77 imp. The optimum is a good 7 HCP. This row is added and highlighted. 7.7 to be exactly. The average 7 HCP is about 7.5.
South has a fixed hand so always 14 HCP. If South has a pattern definition you can expect multiple columns for each point count. So suppose that South has opened a strong 1NT you would see the columns 14, 15, 16, 17. With the 'table data' selector you can switch the statistics shown. This also gives information about the fact when South should invite or just jump to game.