Suppose you are sitting South and have this hand: ♠ QJ72, ♥ 75, ♦ A8732, ♣ 85. All vulnerable and the bidding goes:
| West | North | East | South |
| - | - | 1♥ | P |
| 2NT1 | P | 3NT2 | P |
| 4♥ | P | P | P |
- Balanced GF raise with 4-card support
- Balanced too. No Minimum
What do you lead? The ♠Q could work very well if partner has A, K or 10. How about a ♦-ruff? Maybe even underlead the ♦A for finding Kx with partner. Or do you go for a safe ♥ / ♣-lead. And would it make any difference if it is matchpoints or teams?
Another problem. As South you are holding ♠ A83, ♥ KT3, ♦ T64, ♣ AQ43 and the bidding is:
| West | North | East | South |
| - | 1♥ | P | 2♣ |
| P | 2NT | P | 3♥ |
| P | 3NT | P | ? |
After a GF 2♣ partner wants to play in 3NT. Your turn. The 4333 shape certainly indicates a Pass. But your diamonds are weak. And if it is matchpoints?
Bridge Compass provides the answers to such difficult problems!
Here is how it works. It takes only a few simple staps:
- Define the hands
- Create the deals
- Calculate the Double Dummy results
Back to the first example.
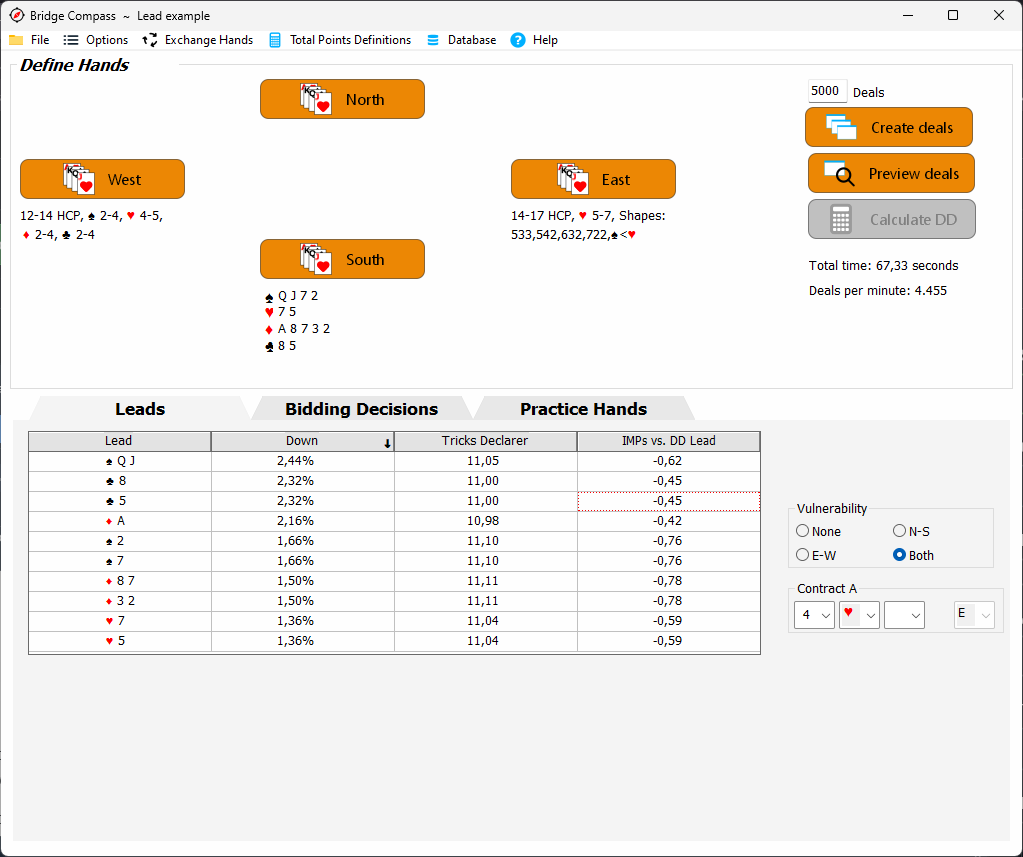
This contract isn't going down often. The ♠Q offers the best change for defeat but the ♦A holds the declarer on average to the least number of tricks. You make that trick, maybe give partner a ruff and you don't give away a ♠-trick. Even on imps this is the long term winner as shown in the last column. A ♣- and ♥-lead both seem passive but the ♣ lead is much better. Probably it gives the possibility for a ruff.
As you can see on the hand summary West has lengths defined. Shapes are also an option as you can see with East. All kind of specifics can be defined. If the definitions change a little the results can change quite a lot. So it is important to get the hand definitions right. This is done in an user friendly way where you don't need any programming skills. Click and play.
Bridge Compass will guide you through the difficult path of becoming an expert player. It is not for beginners. You have to be an advanced player so that you can get the hand definitions and conclusions right. You can fill your own library with specific hands. E.g. a 1NT-opening or a Pass NV on a 1♣ opening. The library can be shared with your partner or friends.
Besides solving lead problems Bridge Compass has the Bidding Decisions tab. There you can compare contracts, check if you should invite or from what point you should accept partners invite. On the Practice Deals tab you can generate specific boards to train your partnership bidding. E.g. you can create 16 boards for your new 1NT-3♣ bid and print the East and West hand separately.
Bridge Compass is based on Double Dummy analysis. That is something to keep always in mind. E.g. a lead of an Ace may be DD the best so you can see the dummy. If partner encourage you can collect that suit else you switch to your KJxxx. Unfortunally in practice partner has the bad habit of returning your first suit and could use some guidance now and then. This is also the case when you make a passive lead. This has a clear Double Dummy advantage because you don't give away a trick that couldn't be made otherwise. This also implicates that partner will find your spot. If this doesn't happen only 1 time out of 10 it means a 10% change on the outcome! So if the differences are small, be careful with your conclusions. Try to see why a lead or bid may be good or bad.
Bridge Compass is completely free of costs and available for Windows (64 bits). In the future probably for a Mac too.
Enjoy.